
In this article we are going to talk about sealing acrylic panels to the rebate, or frame, that holds them in position.
This is an important part of the process of building an aquarium and we are going to use insight provided by the Handbook of Acrylics to identify best practices.
First off, the handbook points out that the best installations are the simplest installations.
When building aquariums it is recommended that there be a concrete blockout larger than the panel size, typically one inch all around.
This blockout needs to be waterproofed prior to the panel being set and sealed. Temporary brackets or shoring should be used to hold the panel in place until the tank is filled.
The water pressure should be what holds the panel in place. It is good practice to reinstall the temporary clamps or shoring onto the panels prior to draining a tank.
The silicone sealant should not be considered in the calculations for panel support. If the tank is to be drained often or the geometry of the
panel is such that the water pressure is not sufficient to hold the panel in place, then permanent clamping or supports should be considered.
Remember, the blockout for the acrylic panel needs to be bigger than the panel. This is to facilitate the silicone sealant and to allow for the straps used during installations to be removed.
In extreme cases where panels are so heavy that larger straps are needed and one inch would not be enough, gaps can be enlarged.
When the gap gets to be over two inches wide, special siliconing techniques need to be used to obtain a proper watertight seal.
Also, the acrylic panels need to be fully supported on the bearing face. The industry standard is to set the panel in the window cavity, set back slightly from the concrete.
The gap between the panel and the concrete is then filled with a non-shrink grout, thus providing a continuous even bearing condition.
The compressive strength of acrylic is three to four times greater than the best concrete, so as long as there are not large rocks in the mix, point loading will not be a problem to the acrylic panel. The grout/concrete will give way before the acrylic panel.
The bearing surface of the acrylic is recommended to be at least three inches in concrete and equal to the panel thickness up to eight inches. The minimum bearing surface allows for general construction tolerances and also insures that there is room for rebar with coverage in the bearing area.
The bearing being equal to the thickness is good practice to keep the edge of
the panel out of view.
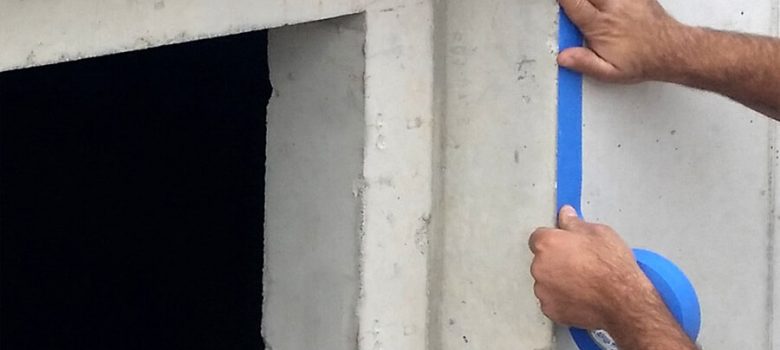
The waterproofing seal for large acrylic panels used in aquaria is structural silicone.
It is not proper to use the physical properties of the silicone as part of the structural design and support of the acrylic panels.
The silicone should be used and considered only for the watersealing function.
Let’s take a look at installation procedures to get a better idea of how to seal rebates and acrylic panels.
Panels are delivered to the window openings in the concrete wall by best means (dollies, cranes, forklifts, etc.). Nylon slings are used to lift panels and place them in the window openings.
The panels are placed on setting blocks. Temporary retaining clamps are used to secure the panels. The panels are then grouted into place.
Once the grout is cured, room temperature vulcanizing silicone sealant is applied to the joints between the acrylic and the tank. There will be a primary (wetside) seal and a secondary (dryside) seal. The silicone is left to cure.
Upon filling of the tank, there is an inspection for leaks. If a leak is discovered at the silicone joint, there are techniques that have been developed that will stop the leak without having to drain the tank.
Let’s look at a couple of sample installations to learn more.
The Colorado’s Ocean Journey in Denver has an overhead demi-tunnel for a near-shore wave exhibit. The visitor gets a view of what is happening under the water as a wave crashes.
The exhibit also has another overhead demitunnel in the shark and ray tank. There is something eerie about sharks swimming above you.
Using the compressive strength properties of acrylic and curving panels into the tank offers some other exciting options.
A curved panel in compression can accommodate the use of silicone joints between the panels to eliminate a chemical bond or mullions that would normally need to be used with a flat panel design.
Using the proper installation techniques, adjoining curved panels, where the convex side is wet, will support one another when filled with water.
The largest and best use of this type of design is at the Aquarium of the Pacific in Long Beach, California. Originally the main Preview Tank was to be three flat panels, each with a 9’ wide of view, 26’ tall separated by 18” wide mullions.
The design was changed to a curved panel bowed into the tank. The 18” wide by 26’ tall concrete mullions were eliminated. The new view is almost 30’ wide, 26’ tall with two silicone joints only 1” wide.
The view was greatly improved and the customer saved money because they didn’t have to pay for the huge concrete mullions.